This blog post shows how to validate the move operation of resources between 2 Azure Subscriptions and how to move them successfully by going through all the steps needed.

Microsoft Azure offers the possibility to move resources from one resource group to another one in the same subscription or from one Subscription to another Subscription in the same Azure tenant.
The available documentation is limited for the validation so that you have to put the puzzle together yourself by collecting each piece of information from different articles. Therefore, my main goal is to give you a guidance from A to Z without the need to waste your time. I will add links for the different articles that I used in case you are interested in reading them.
To move the resources, there are 2 major steps:
- Validate the move operation: It is optional, but highly recommended.
- Move operation : The main action.
— — — —
Part 1: Validate the move operation
To validate the move operation, we need to call the dedicated REST API endpoint. There is no other option for this action. To execute it succesfully, we have to:
- Create an Azure Service Principal,
- Prepare the request body,
- Get an access token,
- and finally make the REST Call
1 – Create Azure Service Principal
You can skip this step if you have one already.
First, Let’s create an Azure service principal (sp). If you are not familiar with Azure sp, basically we are registering an application in the Azure Active Directory (AAD) and assigning a role to it. Check the official documentation to learn more about Azure service principal.
Create the application with just 2 clicks in Azure Portal: go to Azure Active Directory >> App registrations >> fill the form. You can do it also with PowerShell or Azure CLI.

Next, we generate a client secret by going to Certificates & Secrets tab and clicking on Add a client secret. Note the client secret, we will need it in the next steps.
Finally, we have to assign the Contributor role for the registered application in the source resource group.
2 – Prepare the request body and URI Parameters
We need to collect the following items:
- Tenant id
- SubscriptionId of both the source and the target Subscriptions
- Names of both the source and the target Resource Groups
- Sources that we desire to move
Let’s start by connecting to azure and listing all subscriptions in PowerShell:
Connect-AzAccount

# List subscriptions
Get-AzContext -ListAvailable | Select-Object Name, Subscription, Tenant | Format-List
Then, we need to set the context to the source Subscription and get the resource group name (in case you forgot it 😄)
# Select a subscription as current context
Set-AzContext -SubscriptionId <sourceSubscriptionId>

# Get Names and Locations of resource groups in the selected Subscription:
Get-AzResourceGroup | Select-Object ResourceGroupName, Location
Finally, we get the Ids of the resources in the given resource group. I add formatting so that you copy paste straight to request body. You only need the first command to get the resources:
# Get the resources
$resourcesList= Get-AzResource -ResourceGroupName 'rg-sdar-westeurope' | Select-Object 'ResourceId'  | foreach {$_.ResourceId}

# Format the values by adding double quotes and join them with commas
$resourcesListFormatted= '"{0}"' -f ($resourcesList -join '","')

# Copy to clipboard
Set-Clipboard -Value $resourcesListFormatted
Create a new http request in Postman, go straight to the body tab, and choose the type raw. Construct the request body as follows:
{
 "resources": [<paste the recently copied resources list>],
 "targetResourceGroup": "/subscriptions/<targetSubscriptionId>/resourceGroups/targetResourceGroupName"
}
It should look like this:

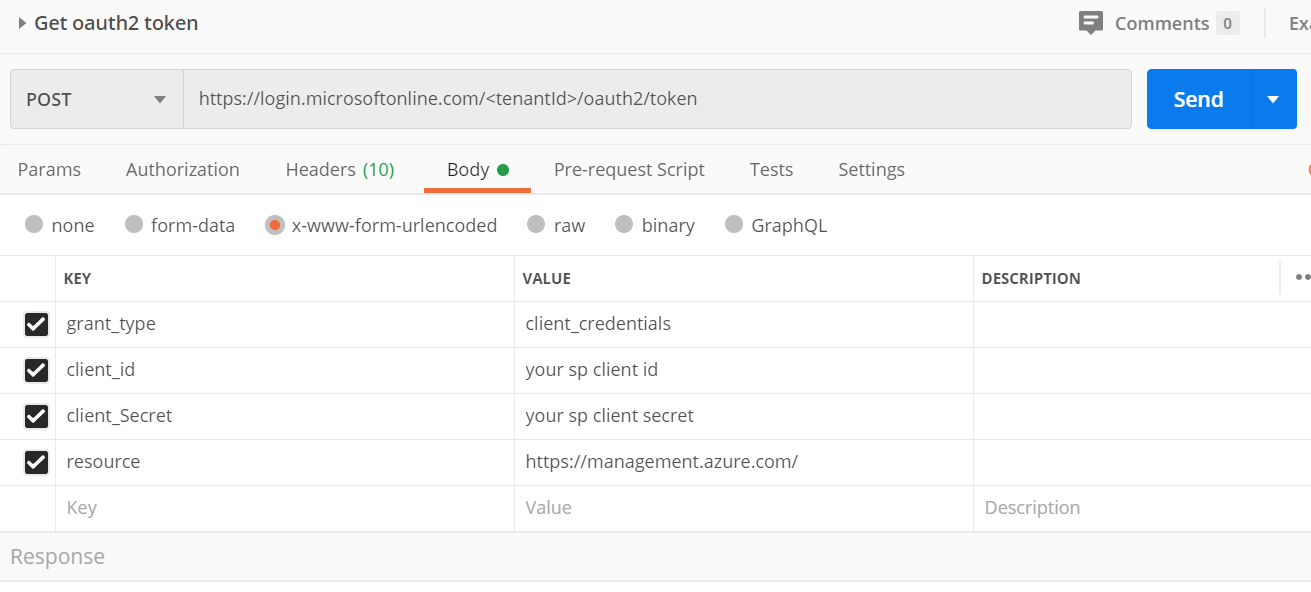
3 – Get Oauth2 Token
It is mandatory for the authorization of the POST request.
We get it by making a POST Call to https://login.microsoftonline.com/<subscriptionId>/oauth2/token with the following values in the request body (formatted as x-www-form-urlencoded in Postman):
- grant_type : client_credentials
- client_id : client_id of the registered app in the first step
- client_Secret : the noted client secret in the first step
- resource : https://management.azure.com/
4 – Validate the move operation
All the previous steps lead to this action. Go to the Post request created in the second step and paste the request URL with the required values https://management.azure.com/subscriptions/<sourceSubscriptionId>/resourceGroups/<sourceResourceGroupName>/validateMoveResources?api-version=2019-05-10
The authorization type is a Bearer token. Use the received access token that we gained in the previous step.

Send it. The response status code should be 202 Accepted with an empty response body.

In case you get 400 Bad Request with a response error message ResourceNotTopLevel, you need to remove that resource from the validation request body, because it will be moved automatically with the main resource. You can get this error with database or WebApp slot >> The solution is to move the SQL Server and the whole WebApp that has the WebApp slot respectively.
Make sure you have the permissions needed, you checked the limitations of your sources, and the subscription quotas. For more details, read the checklist before moving resources section in the official documentation.
— — — —
Part 2: Move resources
To move the resources to another subscription, it is possible to do it in 4 different ways:
- Post Request with the REST API (Similar to the validate move operation)
- Azure PowerShell
- Azure CLI
- Or using the Portal
I am a lazy person, so I always choose the easiest way. That means Portal is the choice 😂.
Go to the source resource group, click on Move and choose to another subscription. Next check the checkbox for the resources that you want to move, select the target subscription and the target resource group. Finally click ok.
Congrats, you moved the resources to the new subscription like a champ 😎.